Original Rogue: 2014
A little bit of everything lifestyle blog with a dash of geekiness and a splash of Manchester love!

Saturday 7 June 2014

Lou On Set - Your First Day On Set

So you're all prepped and ready to go.

By now the production will have sent you a call sheet - study it carefully! It has all the contact details of the important folk on set (save these into your phone straight away) and in the production office, details of the scenes being shot that day, the location of the unit base and location for the day. Importantly it includes what time you need to report to unit base, when shooting starts and when shooting wraps.

GET TO THE UNIT BASE EARLY


Much better to be super early than even a little late - every minute is accounted for so once people start being late it affects the whole production. Remember everyone in the industry is linked to each other one way or another and they will talk - you're only as as good as your last job.

FWIEND, OO RUNNER FWIEND!


Make friends with the other runners. Yes you may end competing against each other for future jobs but they are also your ally. Runners help each other out, whether that's from the day to day activities on set to recommending you for other jobs in the future if they are too busy to take it. You're all at the same level and as you progress up the career ladder, those are friendships you'll want to keep nurturing - one day you might end up employing each other for your own projects and you'll always be able to call on them for advice.

DROP THE ATTITUDE

Artwork by David Allcock

It doesn't matter how much you filming you did at uni or whether you won awards for your student film, you are starting at the bottom and no one gives a shit - they just want you to be friendly, reliable and efficient. One of the things I heard on my course was about runners who came into the role thinking they were better than making the tea because they had a degree or had directed some shorts. If you don't want the role, there are hundreds of others who do. Embrace being a runner and don't try to run before you can walk - when people think you're ready to move up the ladder, they will let you know.

MAKE TEA WITH LOVE


Never underestimate the power of a good cuppa! Make sure you pick up on the first day how all the HODs & cast take theirs and remember. If you can't remember, write it down and stick it above the kettle! Always carry a spare stash on you if they like herbal tea or hot chocolate that isn't normally providing by the catering staff.

This excellent video shot on the set of Call The Midwife might give you some idea of what you're letting yourself in for....


Good Luck!

Lou On Set - Getting Ready For Your First Day

So you got the job or landed that work experience as a Floor Runner! Congratulations!


After you've finished ringing round everyone you know with your exciting news, you need to start preparing for your first day - below is everything you need to be ready and raring to go on that first day!

ESSENTIAL KIT

A Thick Belt or Bum Bag - You'll be given a radio to communicate with the rest of your team when you arrive and you'll need something strong to hang it off. I originally had a belt but was enlightened to the use of a bumbag by one of the other runners and I much prefer it. All those handy little pockets for storing just about anything in! We both ended up with the same one from Lowe Alpine which is brilliant


You can purchase one from any good outdoor sports shop for £12.50 and it has 2 litre capacity with several pockets internal and external.

Decent Shoes - you might be trapsing over all manner of terrain, these need to be shoes you don't mind getting dirty, support your feet well, waterproof and are comfortable for a 12 hour shoot. Walking boots, Timberlands, sturdy trainers are all good footwear.

A Mini Notepad & Several Pens - write everything down. If someone gives you an instruction/tea order and you don't think you can remember it, write it down. You won't be penalised for writing but you will be if you get it wrong or forget it! If you can't do something, tell someone straight away. Don't keep quiet and hope it will go unnoticed - everyone else is extremely busy but they will noticed if something they asked for isn't completed. People borrow pens all the time - make sure you have a few spares!

A Spare Battery/Charger - It's a long day on set so make sure you have a phone charger to keep it juiced up and a spare battery for your radio or to give anyone else who needs one.

A Watch - need I say more?

A Waterproof & Warm Clothing - the weather can be wildly unpredictable as we all know. Make sure you're covered for all eventualities. That also includes sunnies should the sun happen to make a rare appearance!

A Sharpie - ridiculously useful! You may need to write signs, write names on covered plates of food, anything really!

A Mini Torch - a good strong mini torch is really useful, either for being on night shoots or poking around in dark corners. You can get ones small enough to fit in your pocket or bumbag that still pack a powerful punch!

WHAT TO WEAR - A TV/FILM RUNNERS WARDROBE

Most films crews dress pretty casually - you have to wear stuff that's comfortable but you don't mind getting potentially mucky! Skirts are pretty much a no no - shorts, cargo pants, leggings and jeans are all good.

I personally wear my Black Milk leggings - but that's part of who I am! I team them with a pair of Timberland boots, t-shirts, vest tops, jumpers and a North Face gilet - I got mine from Nevisport in Manchester.


I find the gilets are a really good item - it's worth investing in a proper feather & down one as they're like a mini duvet - keep you toasty when you need to be and cool when you don't! It also leaves your arms completely unrestricted and has several zip up pockets including an inner one - perfect for all those bits and pieces you need to carry!

Lou On Set - Top Tips For New TV/Film Runners

So you want to become a runner in the Film/TV industry but where do you start?

KNOW WHO TO CONTACT

Unless you know that you want to be in the Art/Editing/Camera etc Department, most people will start out as a Floor Runner or Production Runner/Assistant. You can try sending out your CV in a scattergun approach to various production houses but it's not likely to get to the right people.

For Floor Runners, you need to be emailing your CV to the 2nd ASSISTANT DIRECTOR. This may vary slightly on some productions, but for most they will be the person in charge of hiring runners.

For Production Runners, you need to send your CV to the PRODUCTION CO-ORDINATOR.


I keep track of everyone I've contacted in a spreadsheet with the date, their details, whether their response was positive or negative. You don't want to end up pestering people so it's good to keep an eye on when you last contacted them when following up (1 - 2 months is a good time to leave it). Spread your net wide and contact as many as possible!

TIDY UP YOUR CV

Don't send out a carbon copy, tailor your CV for each individual role and whatever you do don't attached a picture or a tea bag! Your CV should be no longer than a page and spaced out - these folks are super busy and have only mere minutes (sometimes even no more than 30 seconds) to scan over your CV amongst the hundreds of others they get. It needs to be short, snappy and to the point listing the features you've worked on, your role, relevant transferable experience and any useful skills like First Aid qualifications.

If you have to put a personal statement, keep it only to a couple of lines. Always send your CV as a PDF so there's no bouncing around with the format when it arrives on a different computer.


LEARN HOW TO DRIVE

Runners will be needed to ping all over the place - if you're 25 or over, it's definitely an advantage for productions who need to hire a car for runners to drive. If you've got your own car, even better. Make sure you pop that you have a license right at the top of your CV - it's important.

If you do have your own car, make sure it's got business insurance so you're covered when doing any driving/errands/picking up cast members for the production.


TALK TO EVERYONE

Someone knows somebody knows somebody who works in film or tv.....sound familiar? You never know who might just be that connection you're looking for. Talk to everyone, network, ask around. Check on Twitter - is anything filming in your area? If it is, go down and talk to the crew.

I've done this several times recently with productions filming at the town hall in Manchester - wrap up warm and be prepared to wait around for several hours for a break in filming or filming to wrap. Be friendly and chat to everyone - network, network, network!


BE AN EXTRA

If you have no experience at all, being an extra is a great way of getting first hand experience of how a day on a film or TV set works. You see first hand how each member of the crew works and even get paid. It's also a great way to be in a position to chat to that AD at the end of the day, speak to the runners about how they go into it and decided if it it's a something you really want to get into.


SIGN UP TO DATABASES

There are many excellent databases and resources out there for new runners, all over the UK. Wales and the North are becoming ever increasingly popular meaning there are more opportunities than ever for those based outside of London. Sign up with these folks to get the ball rolling

Creative England

The Talent Circle

The CallTime Company

The Knowledge

Remember running is all about  
 PASSION, PATIENCE & PERSEVERANCE!

Lou On Set - New Beginnings

I recently decided I wanted to finally make the leap and change career from PR/Social Media into the Film & TV industry. I've always wanted to work in the industry but straight out of uni, I was more attracted by the steady monthly income in my bank account and the regularity of a 9-5! In a nutshell, I wasn't quite ready. Several years later and some brilliant friends along the way, I've now started to make the leap into this wonderful and exciting new career and follow my dream (as cheesy as that sounds!)

So where to start?

I wasn’t quite sure – I had a few contacts but no idea on how to best approach them or where to get the ball rolling! I spotted a dream job for Game of Thrones as Production Secretary and whilst I had the admin experience requested for the role, I’m pretty sure my application was completely wrong and tailored incorrectly for a TV job! No wonder I never heard back!


Luckily for me, I spotted on Twitter that The Production Guild was doing an intensive training course for runners trying to break into the industry. The timing couldn’t have been more perfect!

Lead by industry professionals and offering advice on how to tailor CVs, what to expect, set etiquette and opportunities to network, I booked a ticket without hesitating! I’d missed the Manchester session (they run them at various locations throughout the country) so a few days later, I was on a train down to Cardiff to attend the course at the beautiful Millennium Centre in Mermaid Quay.


Not only is it a fantastic area (BBC Cymru is just across the water – home to Sherlock & Dr Who) but I even made a new friend during the course. I cannot recommend the course highly enough for anyone looking to break into the industry – every single bit of information was invaluable and I made some great contacts from Production Co-Ordinators to Assistant Directors, who have remained in touch with me.


You can find out more information on their website – http://www.productionguild.com/training/runner. Sessions in Belfast & Birmingham are still available for booking later in the year. Even if they're not local to you, it's worth the trip and only costs £41.
 

Feeling exciting, inspired and raring to go, I got back to Manchester and immediately set about tailoring my CV based on the notes I picked up from the course and sending out emails to all local productions.

You can read more on my Top Tips For New Runners

Only a few weeks and a bit of cheekiness later and I’d landed my first role as an Additional Runner for the new Russell T Davies Channel 4 drama currently filming in Manchester – looking forward to the future already! Stay tuned!

Friday 25 April 2014

Ice Ice Baby - The new Fruit Broo Iced Tea Range

So some of you might remember a few months ago, I was raving about the delicious Fruitbroo range. A 100% natural delicious juicy fruity syrup you simply mixed with hot water, it was vegan/pregnancy suitable, gluten free, caffeine free, dairy free and ridiculously low in calories. Phew!

A couple of things I mentioned in my previous Fruit Broo blog post, was how I wished the bottles were larger and how I thought the Elderflower & Lime would be brilliant as a cold drink in summer. It seems like the Fruit Broo gods heeded my call because they got in touch to let me know, not only had they brought out an Iced Tea range but they were in bigger bottles too! 


 "FruitBroo is made from real fruit juices, herbs and spices and this recipe has been specifically blended to be served Iced."

I simply had to try it out and soon the lovely Fruit Broo folks were dispatching their new Iced Tea range up to Manchester for me to delve into. The minute the sun peeped out, I got stuck in. 


Sweet Pear of Peaches! It's the Peach, Pear & Honey Iced Tea!

The juicy peach aroma melts into a tantalising taste of pear with a swish of honey. So tasty it should be naughty!


This flavour hadn't gone down particularly well last time as a hot version but as a cold drink, it was delicious. I don't know if they've altered the recipe slightly or if because it was a bigger bottle and I just chucked it straight it without measuring it out, but the flavours were much stronger. 


Clean tasting and naturally sweet without being sickly and very refreshing - can definitely see myself sipping this at a picnic on a hot summers day or making it up in a flask to take with me on one of my big walks in the Peak District.

The Unquestionably Splendid Darling, Elderflower & Lime!

The refreshingly posh taste of elderflower sparkles thanks to a light twist of lime.


For some reason, I just thought this Fruit Broo syrup would work better as a fizzy drink so I mixed it up with soda water and ice instead. 


An excellent choice (I later tried it with still water, not as keen!), the flavours were more subtle, the lime standing out slightly more but that was to be expected as elderflower is always a light flavour. The overall taste was thirst-quenching, refreshing and very more-ish. I nipped outside, popped my feet up with a book and enjoyed the delicious taste fizzing in my mouth. This is definitely a winner for the summer months, I can see myself adding a splash of Pimms and fruit to the mix! 


 The bigger bottles mean it should hopefully last me a little bit longer than a week - you can see the difference in the bottle sizes here.


However I am prone to just pouring it in straight from the bottle. You can probably make it last longer if you actually measure it out but I like my flavours quite strong - you can see roughly how much I used in a glass this size in one go here


Overall, this is a fantastic product – I'm already in love/obsessed with Fruit Broo and the new range has definitely converted me. They've replaced all the concentrated mixes like Robinsons and Vimto in my kitchen already!

These new Iced Tea versions are currently only available direct from The Fruit Broo Website though hopefully they'll be hitting shelves at some point in the future. As a special treat for my readers, Fruit Broo are offering a online discount so you can grab yourself some now!

Simply enter ICEDHALFPRICE at the checkout which will give you 50% off the Iced Range.

It gets a big thumbs up from me! I'd definitely recommend following them on their various social channels to keep up to date with the latest flavours, competitions and updates. Plus they're really friendly to chat to!

Cheers!


Like FruitBroo on Facebook / Follow FruitBroo on Twitter / Follow FruitBroo on Pinterest


Thursday 24 April 2014

Brow Power - Benefit's Gimme Brow

I'm a bit fan of Benefit's brow range - they were the first brand I came across that did a range of products other than just brow pencils.

I've been using their wax and power kit for years but when browsing their website, I spotted a new product that I was dying to test out. First I needed to get my brows in a semi decent state! I'm terrible at shaping them at home so when I need a tidy up, I head to The Blink Brow Bar for a tint and shape.


There are two of these handily located in Manchester in the basement of Selfridges - one at the Trafford Centre & one in Exchange Square. It's ridiculously easy to get an appointment pretty much any day of the week and the one in the Trafford Centre is even open until 10pm.

Having got my brows threaded into shape (and a complimentary head massage which comes as standard), it was time to nip to Boots and grab myself Benefit's Gimme Brow.


Benefit describes this as "brow-volumising fibre gel". My brows aren't that bad apart from right near the nose where the hair suddenly thins out and decides to grow straight up instead of outwards like the rest of the bloody brow hair! So these are my brows after threading but before I've started using Gimme Brow and the rest of my make up.


Apologies for how terrifying my eyes look close up!

I use short motions upwards along the length of the brow, then stroke the brush tip along brow to define shape. Let it dry and then build coverage in any gaps or in my case, near the inner brow.

This is the difference between a brow that had been done and a brow that hasn't


I'm a really big fan of this as it allows you build coverage but still leaves a natural finish rather than the solid look powder and wax gave. I use the Gimme Brow in medium/dark shade which was perfect: light enough to give a natural look, but dark enough to make an impact and stand out.

Here's the finished look with the rest of my make up - as you can see they really stand out when hair is tied back. 


You can grab it either directly from the Benefit Website or at a counter. It currently retails for £17.50 which I think is a little expensive for the size of the tube you get - 3g but I'm definitely sold on it as a daytime brow definer. It does come with a little tips and tricks booklet if you're not very confident about how to do your brows.


Saturday 19 April 2014

Raspberry Ripple In a Bottle - Frijj Supreme Milkshake

Whilst pottering around Sainsburys today, an attractive looking bottle caught my eye in the milk section. I've always quite like the Frijji range but this new flavour looked right up my street!

Presenting..... The Frijji Supreme White Choc & Raspberry Swirl Milkshake.


I am utterly obsessed with raspberry ripple ice cream so when I find other products that resemble those flavours, I'm all over it. The drinks company Barrs do a version of Cream Soda with a Raspberry Twist which is just delicious - it can sometimes be available in Morrisons but usually has to be purchased online via Waitrose or Ocado.

The packaging on the Frijj bottle itself is beautiful - cream and raspberry marble effect on a black background with ivory and gold text. I'm a sucker for attractive packaging so I popped a couple in my basket and rushed home to try it.


It certainly didn't disappoint - creamy, not ridiculously thick and filling. It satisfied my craving for something sweet and I'll certainly be going back to stock up on more! It's essentially drinkable raspberry ripple in a bottle! What's not to like?


 I think I'm a little bit in love......hands off!

There are several other flavours in the Supreme range including Honeycomb Choc Swirl & Sticky Toffee Pudding. Unfortunately these weren't in stock at the store I visited so will be hunting them down. I've not been asked to review this product, I just had to write about it after drinking it!

They've also just brought out an Incredible range as well with other fantastic flavour combinations that I can't wait to get my hands on and you can find out more on their website or social media pages.


Wednesday 9 April 2014

Elegant Touch Express Nails vs Broadway Impress Nails

For several years I was a devotee of the BioScuplture Gel Manicures but as daily life got more hectic and hands on, I found less time for my nails. My natural nails are always very weak, flaking and generally in crappy condition. Despite my best efforts in filing them, nail creams and strengthening polish, they refuse to behave and my varnish would never last more than 24 hours without chipping.

I decided to treat myself to some press on nails after Sali Hughes in her excellent beauty column recommended them as a top spring nail buy

"I wore these throughout fashion week and people mistook them for a very expensive hipster manicure. They stick on in seconds and stay there (they can be used over and over), looking cute but not twee." - The Guardian Weekend.

The last time I'd used press on nails, I was a kid but the latest range of press on manicures promised salon quality finish in a matter of minutes so I decided to put them to the test.

Elegant Touch Express Nails


These are the Empty Heart design and were purchased from Boots for £8.99. I though the design of these were fantastic - they received lots of compliments from people on Instagram to cashiers in shops and were indeed often mistaken for an expensive manicure. You simply peel off the backing and press on - the glue is quite similar to the stuff used to stick gift cards to their backing.


However I found the glue to be too thick and not very efficient. Twice nails became loose and came off within the first day of wearing them and I ended up having to buy nail glue just to get them to stay on. The thickness of the glue also means the nails don't sit entirely flush with the rest of the nail and are raised slightly at the cuticle. A few days later, I was picking off the glue with tweezers and sticking them on with normal nail glue for a better fit and longevity.

Broadway Impress Nails


The Impress Nails were much better designed - they use small squares of a thin sticky film as adhesive giving them a much more streamline and convincing appearance when applied to the nails. They didn't need any additional glue to hold them and lasted for several days before needing replacing. These also retail at £8.99 and can be purchased from Boots or Superdrug.

The Verdict

Whilst I certainly preferred how well the Impress Nail looked & how sticky they were, their range of designs are limited. There is a wide range of interesting designs on their website but I've yet to see most of these materialise in-store in the UK.

Although Express Nails also has limited instore choice, their range of designs is far more interesting and creative - there is also the option to search for and purchase further designs from their range, directly from their website http://www.eleganttouch.com/all-nails.html.

Both sets were a Short Nail design though Impress offer a Medium Length version in some designs on their website.

Monday 7 April 2014

Embracing my mixed race curls - Kérastase Styling Boucles d'art

In typical girl fashion, I didn't grow to love my curly hair until I was older. As a child, it was a nuisance, unmanageable, tangled and went out rather than down.

Throughout my early twenties, I battered it with hair dry, straighteners, extensions and chemical treatments causing it no end of suffering. I would have continued down this route if it weren't for my hairdresser  - the fantastic Simon at James Roberts Hair & Beauty in Manchester - introducing me to the new luxury K styling range designed by Kate Moss for Kérastase. In particular, this nifty little product for curly girls - Kérastase Boucles d'art.


I was skeptical at first - many mousses claim to leave you with beautiful bouncing curls and leave them crispy and looking like limp turkey twizzlers! I also have the Brazilian Blowdry applied to my hair every 6 months to make it easier to blow dry straight so was certainly not expecting any miracles - I thought it might give it a nice loose curl effect or something similar.

The prouct is a very lightweight foam the boffins at Kérastase like to call aqua mousse - the bottle transforms the water and product within it to foam with a single pump (whatever you do, don't shake the bottle - it makes it foam inside and then it won't come out of the pump! I learnt the hard way)


Simply run a wide-toothed comb through your hair when wet, then grab your mousse and go nuts. They recommend using it liberally and I certainly went to town - it doesn't give you any of the crunchiness you get from other mousses and whilst its slightly sticky when your hair is damp, it completely blends away when dry leaving them soft, shiny and bouncy.

If you've got naturally straight hair or even wavy hair, it's not going to do amazing things for you but if you've got naturally curly hair, it's bloody fantastic. I find it gives a slightly tighter curl with a diffuser than when air dried but this is purely down to personal preference.

With a diffuser

Air Dried

The Kérastase Couture styling range can only be purchased directly from salons in the UK at around £21 - you can find your nearest stockists using The Salon Locator (though online on the US Kérastase website).


Monday 24 March 2014

Ain't that peachy? The Labor Day Peach Pie Challenge

I must say, I have neglected my blog somewhat of late but there's nothing like a good old blogger challenge to get you back in the game! To celebrate the release of their new film Labor Day, Paramount Pictures invited a group of bloggers to take part in a baking challenge and I was lucky enough to be involved.

The Film

Based on the Joyce Maynard novel,  Labor Day tells the story of a depressed single mother Adele (played by Kate Winslet) and her son Henry (Gattlin Griffith) who end up sheltering injured escaped convict Frank (Josh Brolin). A story of love, passion, and betrayal, it's narrated from the point of view of the teenage boy. Frank turns out to be a decent fugitive and a dab hand around the house when it comes to doing repairs, repairing the car and making peach pie in the most iconic scene of the book and film.


You can catch Labor Day out in cinemas now and head to their Facebook page https://www.facebook.com/LaborDayFilm to find out more:  Though if you're like me, you'll come out craving a piece of juicy peach pie - luckily, here's one I made earlier....

The Challenge

Paramount asked us bake our own version of the Peach Pie based on the film recipe but with a twist. 


I'd decided I wanted to use Disaronno in my pie but to avoid it being too sweet, I decided to also include stem ginger and ginger syrup with a dash of cinnamon. Please note all measurements are approximate - I've picked up my mum's way of baking which is to eye things up and estimate! The pie has a short crust base and a puff pastry top.

The Ginger, Amaretto & Peach Pie

        For the base
  • 125g of plain flour
  • pinch of salt
  • 55g of butter 
  • 2-3 tbsp cold water

    The filling

    • 10 medium sized fresh peaches
    • 6 large pieces of stem ginger (chopped)
    • Approx 100ml of ginger syrup
    • Approx 60-80ml of Disaronno amaretto liquor
    • 130g caster sugar
    • 30g of cornflour
    • A dash of ground cinnamon 

    The crust 

    • After accidentally dropping my first attempt, I was a bit naughty and used Sainsbury's puff pastry for the lid - sssh!
    • 1 beaten egg

    Ready Steady Bake!

     
    • Put the flour, salt and butter in a large bowl and use your fingers to rub the butter into the flour until it looks like breadcrumbs.
    • Add the water in small amounts until the dough binds together.
    • Wrap the dough in clingfilm and pop in the fridge for 10-15 minute.
    • Pre-heat the oven to 200 degrees C 
    • Wash, stone, peel and slice all the peaches. Add the sugar, cinnamon, Disaronno, stem ginger and ginger syrup to a large bowl and mix together with your hands. Set aside and leave to marinate for 30 minutes.


    • Roll the pastry out and line the pie dish.  I use ceramic baking beans to blind bake the pastry for 8 minutes. Pop your feet up and have a cuppa whilst waiting for the peaches!
     

    • Drain the peaches with a coriander over a bowl to collect the juices and return the peaches to the mixing bowl.


    • Pop the juices in a small saucepan, bring to the boil and then simmer over a low heat until the juices become a thick syrup. Add the syrup to the peaches and mix together again.
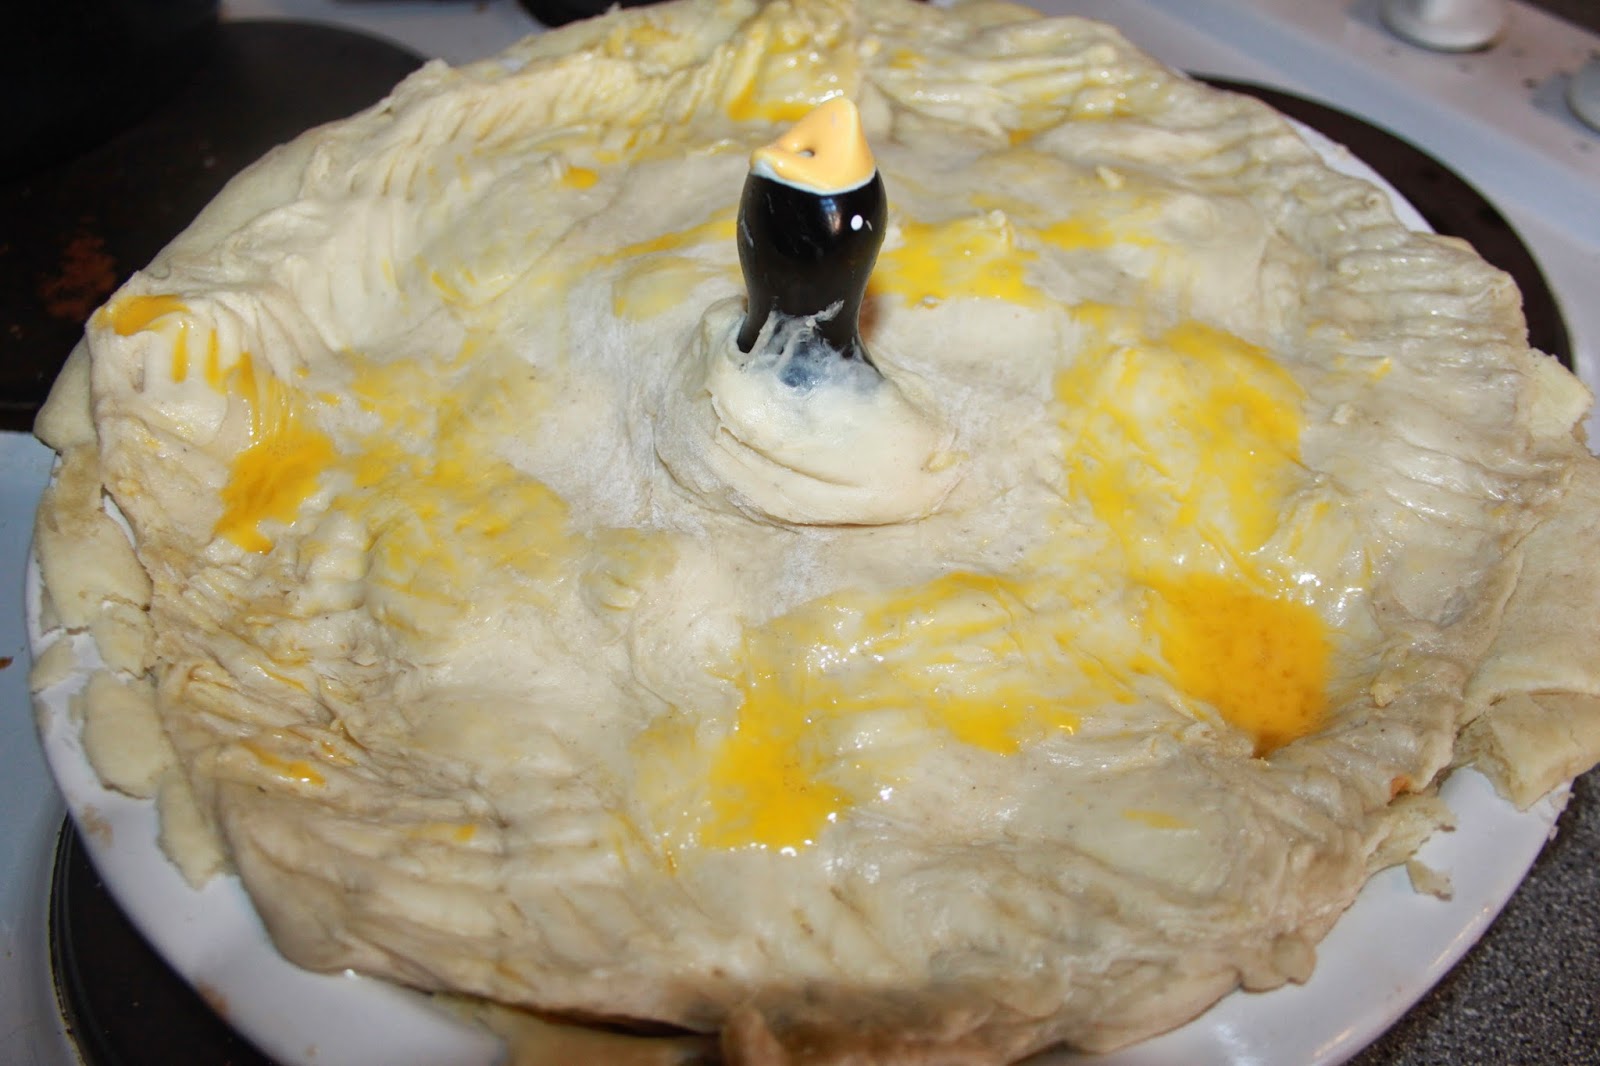
    • Add the filling to pie crust and roll out the puff pastry. I use a funnel to help the steam escape from the pie, you'll need to cut a slit in the pastry where you want it to come through. Brush the pastry with the egg.


    • Pop in the oven and bake for about 30 minutes - I just kept checking on it until it was a golden as I liked. 


    Allow to cool and serve! The pie should serve about 8 -10 people. It works really well with creme fraiche, custard or the blackberry Frozen Fruit! (You can read about those here)